Oracle Enterprise Data Quality (OEDQ) / EDQ Advanced matchers
What is OEDQ?
Oracle Enterprise Data Quality (OEDQ) / EDQ basically enables an organisation to govern data, it facilitates data integration and has the capability to extract basic business intelligence. The objective in applying OEDQ was data cleansing. The first step was to identify and report to business the specific records and table fields that need to be addressed to improve data quality and in cases of weak references, data integrity. It also allowed us to identify where serious input validation is required or where client side validations fails and server side validation is omitted.
Set up OEDQ
-
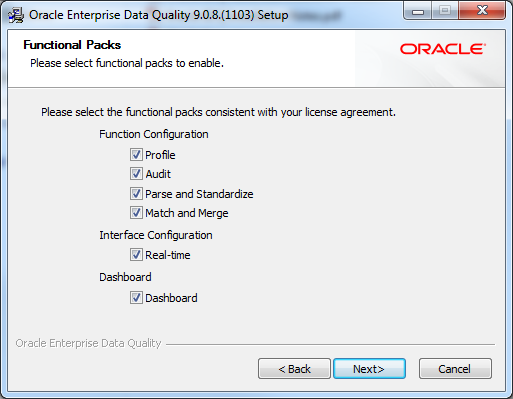
On installing OEDQ version 9.0.8 (1103), I selected all the functional packs.
-
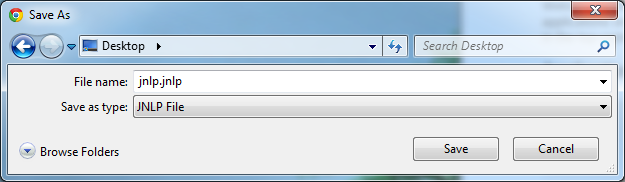
When opening up the OEDQ Launchpad at: https://localhost:9004/dndirector/ and clicking on Launch… underneath Director a jnlp.jnlp file should be downloaded.
-
If when opening the jnlp you are prompted with the below dialog (screen shot 1), got to Windows > Control Panel > Java or Configure Java. You need to Enable Java content in the browser and click on the Edit Site List… button to add https://localhost:9004 (screen shot 2 & 3).
Screen shot 1:

Screen shot 2:

Screen shot 3:

OEDQ basics
The main work flow is pretty simple once you get the hang of it.
Menu:

Work flow:

A Basic work flow to match City in two tables
Right clicking on the menu items provides you with the option to create a new instance of an item.
-
Set up a Source Data Store - this will be the database connection.
Once you created a project you start with a data store (right click on Data Stores > New Data Store…).…if you want to use it across projects you can create one in the top level Data Stores otherwise under a project is fine.

-
Create Snapshots of the data you need to evaluate.
In my case I created two snapshots one of the Customers table and another of the Employees table.(You can create an SQL query as well if you would like a more targeted approach.)

You can see the city column in both the Customers and Employees tables.
-
Create a process to profile the tables, start with a Reader for the Customers table.
3.1 Choose the Customers table and run through the configuration.

3.2 You do not have to Add Profiling.

3.3 This provides us with a process that does not do anything.

-
Add another Reader for the Employees table.
4.1 Select the Data Store icon on the Tool Palette and drag a Reader onto the process panel.

4.2 Double click on the new Reader and select the Employees snapshot at the Source drop down. Select all fields for this exercise - we’ll only be using country though.

-
Add an Advanced Matcher.
5.1 Select the Matching icon on the Tool Palette and drag an Advanced Match onto the process panel.

5.2 Link the first Reader to the Advanced Match Working Data port.

5.3 The configuration window will pop-up after the first link, choose the City attribute and add it to the Selected Attributes list.

5.4 Do not close the process tab Close the Advanced Match tab.

5.5 Link the remaining Reader to the Advanced Match Reference Data port.

-
Configuring the Advanced Match.
6.1 Once you link the second reader the Advanced Match configuration window opens. Double Click on Input to open the input configuration.

6.1.1 Both the Employees and Customers sources should be available as Tabs at the top of the configuration window. Switch between the tabs and ensure the appropriate source is selected for each tab and that the City attribute is added to the Selected Attributes list.

6.1.2 This provides us with the following view displaying the two tables.

6.2 Click on Auto Map Identifies OR alternatively Double Click on the Identify to map the identifiers manually.


6.3 Double Click on Cluster to create one.See the link for further information on Clustering. Click on the + button > then Add Identifier and select City.

6.4 Double Click on Match

6.4.1 City will be available. Select City and click on Add Comparison.

6.4.2 Change the Comparison Type to Exact String Match.Feel free to look through the other options that might come in handy in the drop down.

6.5 Switch to the Match Rules tab and click on the + button at the bottom left to add a match rule. Change the Decision to MATCH and set the value for the Comparison configuration Comparison1 to true.The Matching Rules determine when and how to handle a comparison result. In this case we want it to be treated as a Match.

6.6 Close the Advanced Match tab.
-
Run the process.

-
Evaluate the results.
8.1 We have 8 Matches and clicking on the 8 provides us with a drill down into those 8 records.

8.2 You can drill down into the data to see the relationships and which cities overlap.

Additional Information
- See the Matching Concept Guide for additional information.
- OEDQ is a great tool and is extremely powerful. For the data cleansing project I set up scheduled jobs that profile certain table fields for a degree of quality and produces a few Excel spreadsheet (per business area concerned) with the anomalous records to be addressed. The previous reports are archived and hence, an analysis can be done to determine if data quality is improving or degrading over time. All this was done with built in Functionality provided by OEDQ in conjunction with a few batch files for complex file system I/O operations.
-
The documentation has some crucial information hidden (in a note sections or greyed out sections). However, it is helpful and does explain the reasoning behind the functionality and the operations one can perform. This little snippet explained why I could not see any client side Data Stores in my Tool palette when creating a Job.

Version Information

Moral:
So what can we take from Phil’s infinite wisdom?
-
“You can tell a lot about a person from his Biography.” — Phil Dunphy [Phil’s-osophy]
Reading the help documentation helps…